2026-03-10
Content
Composite siding cladding is an innovative building material engineered for the interior and exterior walls of both residential and commercial buildings. It combines wood fibres or wood flour with thermoplastic polymers — typically polyethylene or PVC — along with UV stabilisers, colorants, and binding agents to create boards that replicate the natural appearance of timber while delivering significantly enhanced durability and requiring minimal maintenance.
Unlike natural wood cladding, composite siding does not rot, warp, crack, or splinter under outdoor conditions. Unlike painted metal or fibre cement, it delivers a warm, authentic wood-grain texture that works equally well in contemporary and traditional architectural contexts. It is one of the fastest-growing wall cladding categories in both residential renovation and new-build commercial construction.
Manufacturing quality directly determines performance and longevity. Composite siding is produced through an extrusion process: dried wood fibre and plastic pellets are blended with performance additives — UV stabilisers, fungicides, colorants, and lubricants — then heated and forced through a shaped die to create a continuous profile. The board is cooled, cut to length, and surface-textured to create realistic wood grain patterns.
The most advanced manufacturing method is co-extrusion, where a dense polymer cap layer is simultaneously bonded to the board core during extrusion, encasing all surfaces. This cap layer — typically high-density polyethylene or ASA (acrylonitrile styrene acrylate) — forms a continuous waterproof barrier that dramatically improves resistance to fade, staining, moisture, and surface wear.
Composite siding cladding is available in three main product types, each with distinct visual and performance characteristics:
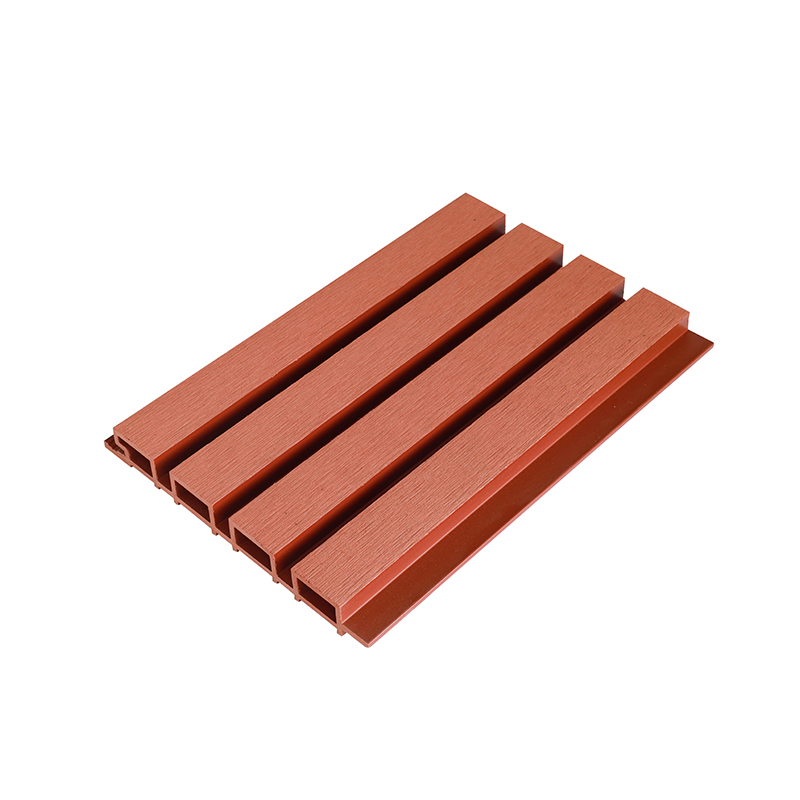
WPC Wall Cladding
Wood-Plastic Composite (WPC) wall cladding is the foundational product type — boards produced from a blend of wood fibre and plastic polymer, extruded into wall panel profiles with a wood-grain surface emboss. WPC cladding is widely used for both exterior facades and interior feature walls, offering a strong balance of natural appearance, structural rigidity, and weather resistance. It is suitable for direct installation on residential facades, commercial building exteriors, garden structures, and interior accent walls.
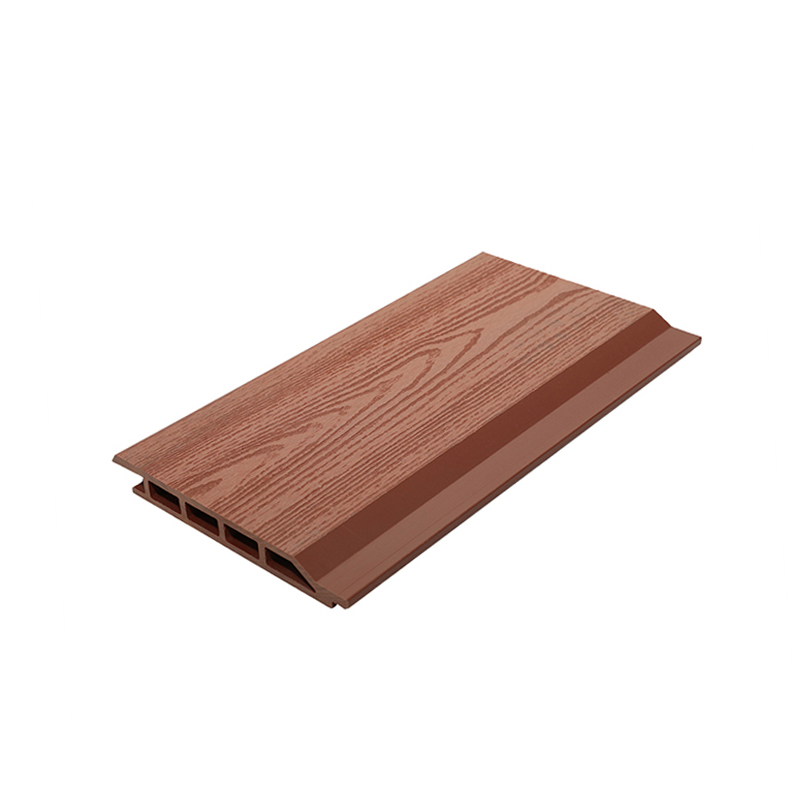
3D Embossed Cladding
3D embossed cladding applies advanced surface texturing technology to create a deeply contoured, three-dimensional wood-grain surface that closely replicates the tactile quality and visual depth of natural sawn timber. The embossed surface creates light-and-shadow variation across the facade, producing a significantly more premium aesthetic than standard flat-embossed boards. This product type is favoured for high-specification residential projects and architectural commercial facades where visual realism is a priority.
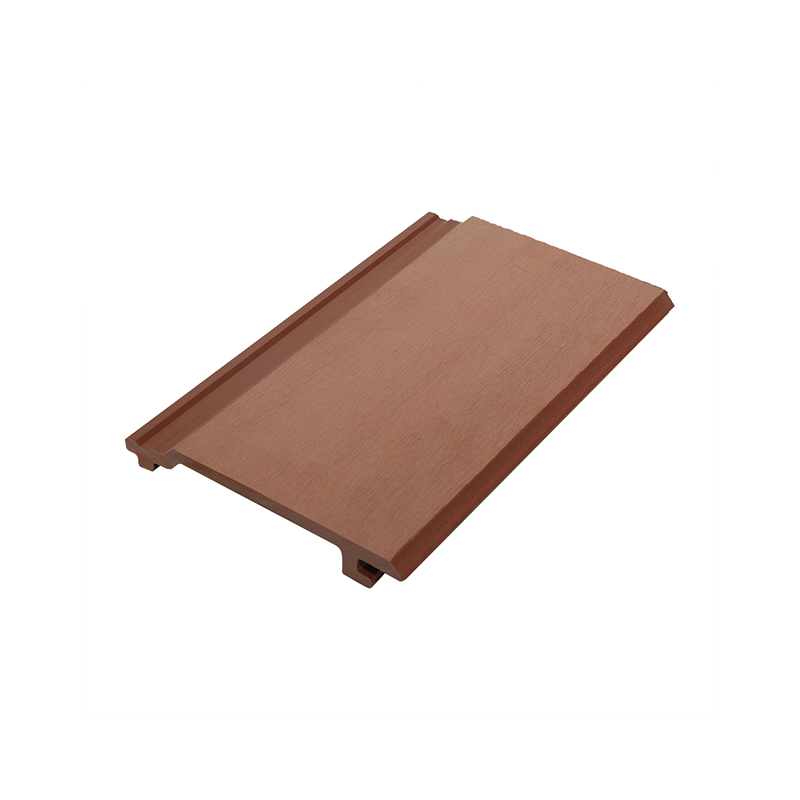
Co-Extrusion Cladding
Co-extruded (or co-ex) cladding represents the current premium tier of composite siding. During manufacturing, a high-performance polymer shell is bonded to all surfaces of the WPC core, creating a board with a non-porous, chemically resistant outer skin. Co-extrusion cladding offers the highest resistance to moisture, UV fading, staining, and surface abrasion of any composite cladding type, and typically carries the longest product warranties — 20 to 25 years in many cases. It is the recommended specification for demanding climate environments and commercial applications.
| Criterion | Composite Cladding | Natural Timber | Fibre Cement | Vinyl Siding |
|---|---|---|---|---|
| Typical lifespan | 25–30 years | 10–20 years | 25–40 years | 20–30 years |
| Maintenance level | Very low | High (annual treatment) | Low–moderate | Low |
| Natural wood appearance | Excellent | Excellent | Moderate | Poor |
| Rot and moisture resistance | Excellent | Poor–moderate | Excellent | Excellent |
| Splinter-free / safe | Yes | No | Yes | Yes |
| Eco credentials | Good (recycled content) | Good (if certified) | Moderate | Poor |
Composite siding cladding is suitable for a wide range of applications in both residential and commercial construction:
The upfront cost of composite siding cladding is higher than some traditional materials, but its total cost of ownership over a 20–30 year period is typically lower due to the elimination of ongoing maintenance expenditure. Natural timber cladding requires repainting or re-staining every 3–5 years — a recurring cost in both materials and professional labour. Composite cladding requires only periodic washing and inspection, with no repainting or retreatment ever needed.
Most quality composite cladding products also incorporate 50–70% recycled material — reclaimed wood fibre from industrial waste streams and recycled post-consumer plastic — making them a materially more sustainable choice than virgin timber harvested from managed forests.
Composite siding cladding is installed using a concealed clip or visible fixing system mounted onto a battened subframe attached to the wall substrate. Boards can be run horizontally (the most common orientation) or vertically depending on the design intent. The process does not require specialist trades — a competent DIYer with basic tools can install composite cladding on a residential project. For commercial projects or large facades, professional installation is recommended to ensure structural alignment and warranty compliance.
Understanding the installation process from start to finish ensures a clean, long-lasting result and avoids the most common errors that cause premature failure or voided warranties.
Before beginning installation, gather the following:
Step 1 — Assess and Prepare the Wall Substrate
Inspect the existing wall surface for structural integrity, dampness, or damage. Composite cladding is typically installed as a rainscreen system — the battened subframe creates an air gap of 20–50 mm between the cladding and the wall, allowing moisture to drain and air to circulate. This gap is important: it prevents moisture trapping and extends the life of both the cladding and the wall behind it. Install a breathable membrane over the wall substrate if required by local building regulations or the manufacturer's specification.
Step 2 — Install the Batten Subframe
Fix battens to the wall using stainless steel screws into wall plugs or structural anchors as appropriate for the substrate (masonry, timber frame, steel frame). For horizontal cladding, battens run vertically at 400–600 mm centres (check the manufacturer's specification — maximum spans vary by board profile). For vertical cladding, battens run horizontally.
Use a long spirit level to ensure every batten is plumb (vertical) or level (horizontal) and flush with its neighbours. A perfectly flat subframe is critical — any irregularity will telegraph through to the finished cladding surface. Pack out low spots with batten shims where required.
Step 3 — Install Starter Trim and Corner Profiles
Fix the bottom starter channel along the lowest batten. This trim receives the first board and holds it in alignment while ensuring a clean finished bottom edge. Install corner profiles at all external and internal corners before beginning board installation — these provide a clean junction and allow boards to terminate neatly without exposed cut ends.
Step 4 — Fix Starter Clips to the Battens
Starter clips are fixed to each batten at the bottom of the installation. These are the point at which the first board is engaged. Space clips strictly according to the manufacturer's specified maximum spacing — typically 400–500 mm — to ensure the board is adequately supported and does not bow between fixings.
Step 5 — Install the First Board
Slide the first board into the starter clips and press firmly until it clicks into position. Check it is perfectly level with a spirit level before proceeding — the first board sets the alignment for every subsequent course. Allow a 5 mm gap at each board end where it meets corner trim or a wall, to accommodate thermal expansion. Composite boards expand and contract with temperature changes; inadequate end gaps cause boards to buckle in summer heat.
Step 6 — Continue Installing Boards Upward
Clip mid-span clips onto the top of the installed board and fix them to the battens. These clips simultaneously lock the lower board in place and provide the engagement point for the board above. Continue upward, checking alignment every 3–4 courses. Stagger board end joints by at least 600 mm where boards do not run the full wall width — this avoids a line of vertical joints running up the facade.
Step 7 — Cut Boards to Length Where Required
Use a fine-tooth saw blade to cut boards cleanly. Cut edges must be sealed immediately with the manufacturer's end-grain sealant — this step is non-negotiable. At board ends, exposed wood fibre is the only point where moisture can enter a capped composite board; unsealed ends are the most common source of moisture-related problems in composite cladding installations.
Step 8 — Finish with Top Trim and Window/Door Surrounds
Once all boards are installed, fix the top finishing trim to close the top edge of the cladding. Fit window and door surround trims to create a clean, weathertight junction between the cladding boards and any openings in the facade. Seal any remaining gaps between trim profiles and adjacent surfaces with a UV-stable, paintable exterior sealant in a matching colour.
| Aspect | Horizontal Installation | Vertical Installation |
|---|---|---|
| Visual effect | Widens the facade; traditional timber cladding look | Adds height; contemporary/modern aesthetic |
| Batten direction | Vertical battens | Horizontal battens |
| Water drainage | Excellent — boards naturally shed water | Good — requires adequate board joint design |
| Common application | Residential homes, cottages, garden rooms | Commercial facades, contemporary homes |
For interior applications, composite cladding installs by the same clip-and-batten principle but with simplified substrate requirements. Interior battens can be fixed directly to plasterboard or masonry walls using appropriate fixings. Moisture management is less critical indoors, but the same expansion gap rules apply — composite boards expand with temperature changes indoors as well as outdoors.
Interior composite cladding is particularly effective for:
High-quality composite siding cladding has a realistic service life of 25 to 30 years, with leading manufacturers offering product warranties of 20 to 25 years. This significantly exceeds the typical 10–15 year lifespan of painted or stained natural timber cladding maintained under normal conditions, and compares favourably with fibre cement at broadly equivalent longevity but with substantially lower maintenance requirements.
Importantly, the "composite siding cladding" category spans a very wide quality range. Budget uncapped products may show significant surface degradation — fading, surface mould, staining — within 5 to 8 years. Premium co-extruded products maintain their appearance and structural integrity for the full 25–30 year service life with minimal intervention. Product quality at the point of purchase is the single most important determinant of lifespan.
| Product Type | Realistic Lifespan | Typical Warranty | Key Limiting Factor |
|---|---|---|---|
| Budget WPC cladding (uncapped) | 5–10 years | 2–5 years or none | UV fading; surface staining; mould |
| Mid-range WPC cladding | 12–18 years | 10–15 years | Gradual surface degradation before core failure |
| 3D embossed WPC cladding | 15–25 years | 15–20 years | UV stabiliser quality; installation correctness |
| Premium co-extrusion cladding | 25–30 years | 20–25 years | Eventual UV accumulation; mechanical damage |
| Material | Typical Lifespan | Maintenance to Achieve It | Re-treatment Interval |
|---|---|---|---|
| Softwood timber (painted) | 10–15 years | High | Every 3–5 years |
| Hardwood timber (oiled/stained) | 20–30 years | High | Every 2–3 years |
| Fibre cement cladding | 25–40 years | Low–moderate | Repainting every 10–15 years |
| Premium composite cladding | 25–30 years | Very low | None — wash only |
| Brick / masonry render | 30–50+ years | Low | Repointing / repainting periodically |
Cap Layer Construction
The most important factor. Co-extruded boards encapsulate the wood fibre core in a dense polymer shell that resists UV, moisture, staining, and physical wear. Without a cap layer, surface degradation begins within the first 2–5 years of outdoor exposure. Specifying co-extruded cladding is the single most effective way to maximise lifespan.
UV Stabiliser Quality and Loading
UV radiation is the primary degradation mechanism for all polymer-containing materials. Boards manufactured with high-grade UV stabilisers — HALS (Hindered Amine Light Stabilisers) technology is the current standard — maintain colour and surface integrity far longer than boards with minimal UV additive packages. Premium products specify UV performance data and include fade warranties lasting 15–25 years.
Installation Correctness
Cladding installed without sealed cut ends, without correct expansion gaps, or on a subframe that traps moisture will fail significantly earlier than correctly installed product. Installation errors are the leading cause of premature composite cladding failure — and the most avoidable.
Climate and Orientation
South-facing facades in high-UV climates experience considerably more UV loading than north-facing facades in temperate climates. All composite cladding ages faster in high-UV, high-temperature conditions. Manufacturer warranties should be reviewed for any climate-specific limitations. In particularly demanding climates, upgrading to a higher-specification product tier is advisable.
Maintenance and Cleaning Frequency
While composite cladding requires minimal maintenance, periodic cleaning meaningfully extends service life. Organic deposits — pollen, algae, airborne pollution — accumulate on the surface over time. Left uncleaned, organic deposits can chemically attack the cap layer surface and harbour moisture. An annual wash with water and mild detergent is sufficient to prevent this.
Ventilation Behind the Cladding
A correctly installed rainscreen system with an open air gap behind the cladding allows moisture that penetrates behind boards — primarily at joints and openings — to drain away and evaporate. Systems installed without adequate ventilation create a persistently damp microclimate that accelerates degradation of both the cladding and the building fabric behind it.
Composite cladding does not fail suddenly the way natural timber does. Degradation is gradual. Watch for these signs during periodic inspections:
Composite siding cladding and wall panels are distinct product categories that serve different purposes, even though both are used to finish wall surfaces. Composite siding cladding refers to individual boards — typically 150–220 mm wide — installed in overlapping or butt-jointed courses on a battened subframe to create a rainscreen facade system. Wall panels are larger-format sheets or tiles — often 600 mm to 1,200 mm wide — applied to wall surfaces as a decorative facing, usually for interior use or sheltered exterior environments.
The choice between them depends primarily on the application (exterior vs interior, exposed vs sheltered), the performance requirements (weather resistance, thermal performance, structural loading), and the aesthetic intent (horizontal or vertical board lines vs large-format panel faces).
Composite siding cladding is engineered for building envelope performance. Individual boards — made from a blend of wood fibre and plastic polymer — are installed on a battened subframe, creating a ventilated rainscreen system that protects the structural wall behind from weather while providing thermal insulation and an architectural exterior finish.
It comes in three main configurations:
Composite siding cladding is designed and tested for full exterior exposure — direct rainfall, UV loading, freeze-thaw cycling, and wind pressure — and forms part of the building's weather defence system.
Wall panels is a broader category encompassing large-format decorative facing products applied to interior walls or, in some cases, sheltered exterior surfaces. Common wall panel types include:
Most wall panel products in the "composite" category are primarily decorative interior products — they create an attractive wall finish but are not rated for, or intended for, full exterior weather exposure as a primary building envelope element.
| Criterion | Composite Siding Cladding | Interior Wall Panels |
|---|---|---|
| Primary application | Exterior facades; interior feature walls | Interior wall decoration |
| Weather resistance | Engineered for full exterior exposure | Not rated for direct weather exposure |
| UV resistance | Excellent (UV stabilisers included) | Not UV-stabilised in most cases |
| Board/panel format | Individual boards (150–220 mm wide) | Large sheets (600–1200 mm wide) |
| Fixing method | Concealed clip system on battened subframe | Adhesive, mechanical fix, or panel groove system |
| Ventilated air gap | Yes — rainscreen air gap is standard | Usually not required |
| Structural load capacity | Engineered for wind loading | Decorative only — no wind load rating |
| Moisture / humidity resistance | Excellent (capped products) | Variable — depends on panel material |
| Warranty (typical) | 15–25 years (premium products) | 1–5 years |
| Aesthetic lines | Horizontal or vertical board shadow lines | Flat sheet with minimal joint lines |
| Cost (approximate range per m²) | $35–$120+ | $15–$80 |
The most important practical difference between composite siding cladding and wall panels is their suitability for exterior exposure. Composite siding cladding is specifically engineered and independently tested for use as a primary building envelope component — it must withstand continuous UV loading, rainfall, freeze-thaw cycling, and wind pressure loading over a service life of 25+ years.
Most interior wall panels are not rated for exterior use and should never be specified as a primary exterior cladding material. Using interior panels externally results in rapid fading, moisture-related swelling or delamination, and structural failure — often within 1–3 years in exposed conditions.
Some specialist large-format composite or HPL panels are designed for exterior use — but these are specifically tested and certified for the purpose, and are distinct from standard interior wall panels. Always verify that any panel product carries an explicit exterior-use certification and weather-resistance rating before specifying externally.
The overlap between composite siding cladding and wall panels is greatest in interior feature wall applications. Both can be used effectively to create textured, wood-finished interior walls in living rooms, hallways, commercial reception areas, and hospitality spaces. In these sheltered indoor applications:
The choice for interior feature walls often comes down to aesthetic preference — board shadow lines versus seamless panel faces — and durability requirements, with composite cladding offering greater longevity in high-traffic or humid interior environments.
| Application / Requirement | Recommended Choice | Reason |
|---|---|---|
| Exterior house facade | Composite siding cladding | Engineered for full weather exposure; rainscreen system |
| Interior living room feature wall | Either — depends on aesthetic preference | Both perform well; cladding gives board lines, panels give flat face |
| Bathroom or kitchen walls | Moisture-rated wall panels or capped cladding | Needs confirmed moisture/waterproof rating for wet areas |
| Commercial exterior facade | Composite siding cladding (co-extrusion grade) | Long warranty, wind load tested, low maintenance |
| Budget interior renovation | Interior wall panels | Lower material cost; faster installation |
For the majority of exterior cladding applications, composite siding cladding outperforms natural wood on durability, maintenance, moisture resistance, and long-term cost of ownership. Over a 20–25 year period, a high-quality composite cladding installation consistently costs less in total — when maintenance expenditure is included — than an equivalent natural timber facade, while demanding far less ongoing effort from the homeowner or building manager.
However, natural wood retains genuine advantages in specific contexts: premium hardwood has an authentic warmth and character at close range that composite cannot fully replicate, and in applications where budget is the only consideration over a short timeframe, untreated softwood has a lower upfront cost. The honest answer is that composite cladding is better for most people in most situations — but it is not a perfect replica of timber, and both materials have their place.
Maintenance Requirements
This is the most significant real-world advantage. Natural wood cladding — whether softwood or hardwood — requires repainting or re-staining every 3–5 years to maintain its appearance and weather resistance. This involves cleaning, sanding, and applying new coatings — typically requiring professional labour on full facades, at a cost of several hundred to several thousand dollars per treatment cycle. Over 25 years, this maintenance expenditure dwarfs the initial cost difference between timber and composite.
Premium composite siding cladding requires only periodic washing — no sanding, no painting, no staining, ever. For any homeowner or commercial operator who values their time and wants to avoid recurring maintenance expenses, composite is the substantially better choice.
Rot, Moisture, and Biological Resistance
Rot is the primary failure mode of natural timber cladding. Even pressure-treated softwood is vulnerable to fungal decay in persistently damp, shaded conditions — particularly at joints, end grain, and areas where the protective treatment has worn through. Hardwood is more resistant but not immune, and requires consistent maintenance to preserve that resistance.
Co-extruded composite cladding is essentially immune to rot. The polymer cap layer presents no organic material for fungal attack, and even at cut ends — sealed during installation — moisture penetration into the core is minimised. In coastal environments, consistently wet climates, and shaded north-facing facades, composite cladding outlasts natural timber cladding by a wide margin.
Dimensional Stability
Natural timber expands and contracts significantly with moisture and temperature changes, causing boards to cup, twist, crack, and split over time. This dimensional movement creates gaps in painted finishes and opens joints to water ingress. Composite boards are far more dimensionally stable — they expand and contract with temperature changes but not with moisture cycling, and they do not cup, twist, or crack in the way natural grain timber does.
Consistency Across Boards
Natural timber varies from board to board in grain pattern, colour, and texture — requiring sorting and selection to achieve a uniform facade appearance. Composite cladding delivers consistent colour, texture, and dimensions across every board in a batch, making large uniform facades easier to achieve without visible variation.
Long-Term Colour Stability
Untreated natural timber greys within 6–18 months of outdoor exposure. Painted or stained timber facades require periodic recoating to maintain colour. Premium composite cladding with UV-stabilised co-extruded cap layers maintains consistent colour for 15–25 years under normal UV loading, with no intermediate recoating required.
Authentic Appearance at Close Range
Modern composite cladding — particularly 3D embossed and co-extruded products — is significantly more realistic than products of 10–15 years ago. From a normal viewing distance, premium composite is difficult to distinguish from quality timber. However, at close range and in direct touch, experienced observers can still tell the difference. For buyers where the authentic character and warmth of real timber is a non-negotiable design priority, natural wood hardwood remains the reference standard.
Heritage and Planning-Sensitive Applications
In conservation areas, heritage buildings, and projects subject to planning conditions requiring natural materials, natural timber cladding may be required by the approving authority. Composite cladding, however realistic its appearance, may not satisfy planning requirements that specifically mandate natural wood.
Repairability
Damaged natural timber boards can be sanded, filled, and repainted to restore appearance. Deeply scratched or mechanically damaged composite boards cannot be refinished — they must be replaced. In practice, composite boards are rarely damaged in normal residential use, but the point is worth noting for high-traffic or accident-prone commercial settings.
| Criterion | Premium Composite Cladding | Hardwood Timber | Softwood Timber (treated) | Winner |
|---|---|---|---|---|
| Service life | 25–30 years | 20–30 years (well maintained) | 10–15 years | Composite / Hardwood (tie) |
| Maintenance needed | Wash only — no treatment | Oil/stain every 2–3 years | Paint/stain every 3–5 years | Composite |
| 20-year total cost | Lower overall | High (material + maintenance) | Moderate (low material; high maintenance) | Composite |
| Rot / decay resistance | Excellent | Moderate | Low–moderate | Composite |
| Natural appearance | Very good (realistic at distance) | Excellent (authentic at all ranges) | Good | Natural timber |
| Dimensional stability | Excellent | Moderate (movement with moisture) | Poor (warping, cupping) | Composite |
| Repairability | Low (replace damaged boards) | High (sand, fill, repaint) | High (sand, fill, repaint) | Natural timber |
| Eco credentials | Good (50–70% recycled content) | Good (if certified timber) | Moderate | Tie |
Upfront material cost comparisons between composite and timber are misleading without accounting for maintenance. Here is a realistic 25-year cost comparison for a 100 m² house facade:
| Cost Element | Softwood (painted) | Hardwood (oiled) | Premium Composite |
|---|---|---|---|
| Initial materials (boards) | $2,000–$4,000 | $8,000–$18,000 | $5,000–$12,000 |
| Maintenance treatments (25 yrs) | $15,000–$30,000 | $12,000–$24,000 | $500–$1,000 |
| Partial re-cladding | $3,000–$8,000 (~yr 12–15) | Minimal if maintained | Negligible |
| Estimated 25-year total | $20,000–$42,000 | $20,000–$42,000 | $5,500–$13,000 |
The cost advantage of composite cladding over a 25-year horizon is substantial — particularly when compared against softwood timber, where low initial material cost is almost entirely offset by the high and recurring maintenance burden.
For most exterior cladding applications, premium composite siding cladding is a better practical choice than natural wood — delivering equivalent or superior durability, dramatically lower maintenance, and lower total cost over the building's lifetime. The buyers best served by natural timber are those for whom authentic material character is genuinely the primary priority, and who are committed to — and budgeted for — the regular maintenance that preserving timber's appearance and integrity requires. For everyone else, composite siding cladding delivers more for less over the long term.

 English
 Français
 Español
 Deutsch


